Saturday, April 13, 2013

Beef Enchilada Cups

I'm always on the lookout for new dinner recipes that are cheap, quick, and easy, and I came across this one  on Pinterest. It's a recipe for Chicken Enchilada Cups using won ton wrappers, and it looked delicious. I picked up a roasted chicken from the grocery store so all I would have to do is shred it up and I used store bought enchilada sauce. So, this recipe took less than 30 min and it was really tasty.

A few nights later, I made the recipe again with my own twist. I used beef instead of chicken and added a few extra ingredients. This is my version of Beef Enchilada Cups:

Beef Enchilada Cups 

  • 24 won ton wrappers
  • 1 lb extra lean ground beef, browned and drained
  • 3 tbsp chopped fresh cilantro
  • 1 can Rotel tomatoes, drained
  • 1 can enchilada sauce (or use about 1/2 cup homemade enchilada sauce)
  • 1 cup shredded Mexican blend cheese
  • 1 to 2 green onions, sliced thin 
Preheat oven to 350 degrees Fahrenheit. 

Press won ton wrappers into the cups of a mini muffin pan. Make sure the edges of the won ton wrappers do not fold in or you won't be able to add you filling later. Bake for 7 min. 

While won ton wrappers are baking, mix together ground beef, cilantro, Rotel tomatoes, and enchilada sauce. Remove won ton cups and add beef mixture, evenly dividing filling between all the cups. Add a pinch of shredded Mexican blend cheese to the top of each up and bake another 6 or 7 min. Cups are done when the cheese is melted and the edges of the won ton cups are just beginning to brown. 

Remove cups and top with a few slices of green onions. You can also top with other garnishes like sour cream or salsa. 

Enjoy!


Wednesday, April 10, 2013

Composting

Composting is something I have wanted to start but haven't yet because I just hadn't found the right system for us. I wanted something easy to assemble, fairly compact, and most of all...... cheap!! So, when I came across a tutorial on building your own compost bin from wood pallets on One Hundred Dollars a Month, I was pretty darn excited. 

All you need to complete this project using this tutorial is 4 or 5 wood pallets and a few smaller things like hinges and 14 gauge wire. The best part about this- you can find pallets for FREE!! Just check your local hardware store or other similar places and see if they have extra pallets they would give you. 

My dad told me today that our local electric company has lots of extra pallets that they give away daily, so that's where I'm planning on getting mine for my compost bin. Yay! 

Once I (and by "I" I mean my sweet hubby ;)) build our new compost bin, I'll post pictures for you all to see! But, for now, let's talk about the do's and don'ts of composting.

What can I put in my compost bin?

- Pretty much anything plant based 
      -fruit and veggies peels and leftovers
      - grass clippings
      - fallen leaves
      - straw
     - shredded newspaper
      - wood shavings or sawdust (in limited amounts)

- Some animal based ingredients 
      - crushed eggshells
      - manure from plant-eating animals like cows, horses, or chickens 

This is a pretty small list. In the All New Square Foot Gardening book, you can find more information on composting.  

What can't I put in my compost bin?

- Material that is diseased or infested with pests
- Meat or animal bones
- Grease
-Whole eggs
-Dairy products
-Seeds or fruit pits
- Manure from animals that eat meat like cats or dogs
-Bakery products
- Supper plate scraps

Do I need to turn my compost pile?

Technically, aerobic compost (exposed to air) doesn't need to be turned. Building a compost bin out of wood pallets, your compost pile will be exposed to air as the pallets have open slats in them.

But, I would turn my pile anyways (and plan to). Turning speeds the decomposition of your compost pile significantly because it increases the oxygen exposure to all parts of the pile and it helps to ensure your compost pile doesn't begin to have a foul odor. 

Turn the pile every 10 days or so with a shovel or garden fork. You can also use a compost aerator to turn your compost pile. This one is reasonably priced and has good reviews on Amazon. 

Keeping the compost pile moist

Your compost pile needs to stay moist, not wet, in order to decompose properly. So, check the consistency of the pile, and add water as needed. I think a great time to do this would be right before you plan on turning your compost pile. This would help to evenly distribute moisture. 


That's composting in a nut shell! We plan on building ours this weekend hopefully, and I'd love to see pictures of yours or here any words of wisdom from those of you who currently compost.

Happy composting!! 

Monday, April 8, 2013

Family trip to the park

So the weather here in Texas is starting to warm up nicely. Well, except for the random day with the high in the 50s but... anyways. My family decided to take advantage of the lovely spring weather, make a picnic lunch, and head to the park.

Our small town has a really nice park that was revamped a few years ago. Its got a great little play area and a covered pavilion with picnic tables. So, I packed up some chicken salad wraps(check back Saturday for my recipe!), some cuties, and apple juice, and we headed out to the park with Grumpy and Nonna (my mom and dad) and Mama Sue (my grandmother).

Mia had a blast playing with me and her daddy and the grandparents got a kick out of watching it all. She's just so cute you can't help but love her :).


Mia and Daddy on the swingset

Mama Sue, Mia, and Grumpy


Our beautiful girl!

Saturday, April 6, 2013

Fabric Flower Canvas

I love doing crafts with canvas. It's cheap, readily available, and easy to work with. So, I wanted to share my latest craft I've done with canvas. And it's super adorable!!

DIY Fabric Flower Canvas Art

Materials:


an 11x14 canvas 
1 fat quarter
a staple gun
scissors (not pictured)
hot glue gun (not pictured)
Felt fabric flower (link to tutorial to follow)
iron and ironing board 

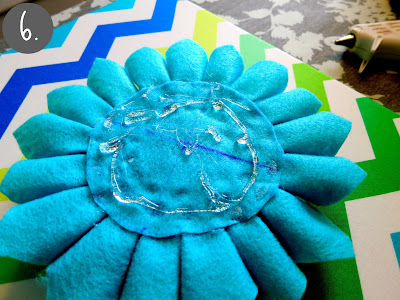
First, I made my fabric flower using the tutorial found here. It's a picture tutorial but it's pretty easy to follow. I did find that I needed to cut more pentagons out ("petals") than she indicated, but other than that I just followed the pictures exactly. If you have questions, feel free to leave me a comment below. Oh, and a little tip: use something to press the bottom corners of the petals into the hot glue you place in the middle besides your finger (yup, I learned this the hard way). I used the tip of a mechanical pencil. 


Next, I covered my canvas with my fat quarter which I got from Fresh Modern Fabric on Etsy. It is good quality fabric for a great price. 

First, iron your fabric, being sure to get all the wrinkles and creases out. Lay the canvas on the fat quarter, making sure the fabric will be lying straight on the front of the canvas (especially if your fabric has a print like this fabulous chevron fabric). Next, trim your fabric to the appropriate size to ensure you have plenty of extra to stretch around the back and staple to the canvas. 


Step 2 is to wrap your fabric up around on of the long sides of your canvas and secure it using your staple gun. Repeat this on the other long side of the canvas. Be sure to stretch the fabric tight as you staple you second side so you won't have any wrinkles in the front.


To begin the first shorter side, I staple both corners using a technique similar how you would wrap a gift (see pictures below). Then I do the middle of the side and repeat the process on the last side. 


All 4 sides of the canvas should be completed now.


The last step is to add your fabric flower you made. Cover the back of the felt flower with hot glue and place it on the canvas. I did mine in the upper left corner, but you could place it in the middle or wherever you like. 


Simple, right? Making your flower takes the longest, but the result is totally worth it! So cute!